Showing posts with label Excel Formatting. Show all posts

Tuesday, April 29, 2014

Menu Monday - Sort


Using the "Sort" functionality in Excel is an excellent way to help organize your data set.  It's very useful in sorting either alphabetical values or numeric values.  You can also get fancy and sort by things such as cell color, font color or cell icon :-)  The sort functions can be found on both the Home and Data tabs.

 Home Tab:

Data Tab:
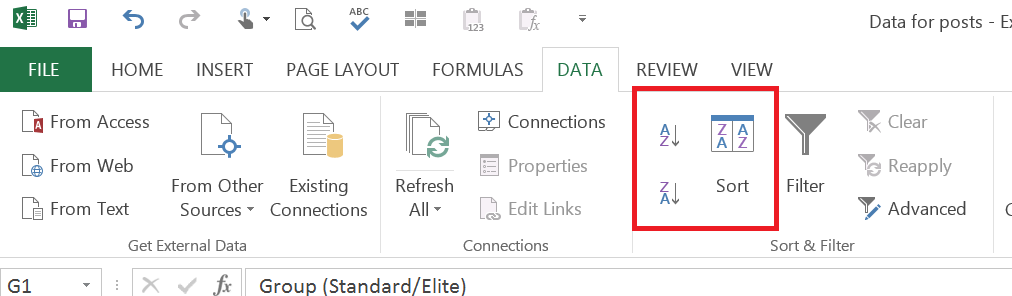
 

On each of these tabs, Excel gives 3 different options (icons) to use for sorting
1. Sort Lowest to Highest.  Excel will automatically sort the data using the column your cell is in as the column to sort by.  It will automatically determine the data set to be used.
 
2. Sort Highest to Lowest.  Excel will automatically sort the data using the column your cell is in as the column to sort by.  It will automatically determine the data set to be used.
 
3. Custom Sort. When you click on this icon, a window will pop up to let you customize what and how the data is to be sorted.  Using this option will let you sort by more than one column which can be very beneficial.

Example 1:
- In this scenario, I want to sort the data by the Contribution Amount and I want the values sorted lowest to highest.
- Click on any cell in column F, within the data set.  I chose to click on cell F3.

- Click on the Data tab
- Click on Sort Smallest to Largest (Lowest to Highest) icon.
- Excel automatically assumes that I want to sort the data in cells A1 through G10 and uses column F as the column to sort by from the smallest value on top to the highest value on the bottom.
- The data is now sorted based on column F
 

Example 2:
- In this scenario, I want to sort the data by Group and I want the values sorted highest to lowest as I want to see the Standard group first.
 
- Click on any cell in column G, within the data set.  I chose to click on cell G6.
- Click on the Data tab
- Click on Sort Z to A (Highest to Lowest) icon.
=
- Excel automatically assumes that I want to sort the data in cells A1 through G10 and uses column G as the column to sort by from the highest value on top to the lowest value on the bottom.
- The data is now sorted based on column G
 

Example 3:
- In this scenario, I want to sort the data by Name and I want the values sorted lowest to highest.  In order to do this I will need to sort on both the Last Name and First Name columns.

- Highlight cells A1 through G10

- Click on the Data tab
- Click on the Sort icon.
 
- A new window will pop up to allow customization of sorting

1. In the drop down under Column, choose Last Name
2. In the drop down under Sort On, choose Values
3. In the drop down under Order, choose A to Z
4. Click on Add Level to add another column to sort by
5. In the drop down under Column, choose First Name
6. In the drop down under Sort On, choose Values
7. In the drop down under Order, choose A to Z
8. Click OK


- The data is now sorted by Last Name and then by First Name
  

 Excel ya later!

Monday, April 7, 2014

Menu Monday - Conditional Formatting - Duplicates (Highlight Duplicates)


In an earlier post, I went through the steps of using the Remove Duplicates function in Excel.  This is great if you want to completely remove the duplicate values.  But what if you want to just find the duplicate values in your data set?  There are some formulas you could use to do this, but another easy way to do it is to use the Conditional Formatting function.

To use this function:
-Highlight the cells where you want to find the duplicate values
-The cells can be in multiple rows/columns and do not have to be adjacent to one another
-Click on the Home tab
-In the Styles section, click on the Conditional Formatting drop-down menu
-Hover over "Highlight Cell Rules"
-Click on "Duplicate Values…"
-A new window will pop up to ask how you would like the cells formatted
-Leave the left drop-down menu on "Duplicate"
-The right drop-down menu can be left alone if you are ok with the default formatting, or you can click on the drop-down menu to adjust the formatting
-There are multiple default formats, otherwise you can click on "Custom Format" to create your own
-Once you have made your formatting choice, click OK
-Now, looking at your data set, you should see the duplicate values formatted in the way you chose

Example 1:
-In this scenario, I want to highlight where I have duplicate names in my data set
-Highlight cells A2 through A1
-Click on the Home tab
-In the Styles section, click on the Conditional Formatting drop-down menu [1]
-Hover over "Highlight Cell Rules" [2]
-Click on "Duplicate Values…" [3]
 
-A new window will pop up to ask how you would like the cells formatted
-Leave the left drop-down menu on "Duplicate" [1]
-In this scenario, I am ok with the default formatting on the right drop-down to have the cells filled with light red and have dark red text [2]
-Click OK [3]
-Now the duplicate names are highlighted in red and have red text
 
Example 2:
-In this scenario, I want to highlight where I have duplicates in List 1 and List 2
-Highlight cells A2 through B8
-Click on the Home tab
-In the Styles section, click on the Conditional Formatting drop-down menu [1]
-Hover over "Highlight Cell Rules" [2]
-Click on "Duplicate Values…" [3]

-A new window will pop up to ask how you would like the cells formatted
-Leave the left drop-down menu on "Duplicate" [1]
-In this scenario, I am ok with the default formatting on the right drop-down to have the cells filled with light red and have dark red text [2]
-Click OK [3]
-Now the duplicate shapes are highlighted in red and have red text
 
Excel ya later!

Tuesday, March 4, 2014

Menu Monday - Format Painter

Do you like the format settings you have set up for a certain cell and want those same exact settings for another cell(s)?  Well, if so, the Format Painter function is your new best friend. 

There are 2 options when using the Format Painter function:
  1. Copy the format settings to one cell or one selection of cells.  
  2.  
    • In order to do this, click on the cell that has the format settings you are seeking
    • Click on the Home tab on the Ribbon (Menu)
    • In the Clipboard section on the very left, click on the Format Painter icon
    • Next, click on the cell or selection of cell(s) that you want to be formatted
    • You should now see the cells adjusted to the new format
    • Example 1:
      • In this scenario I want to change Wednesday to be the same formatting as Sunday
      • First, select cell A1 for Sunday
      • Next, click on the Home tab on the Ribbon and click on the Format Painter icon
      •  
      • Now click on cell A4 to change the formatting of Wednesday
    • Example 2:
      • In this scenario I want to change Wednesday through Friday to be the same formatting as Sunday
      • First, select cell A1 for Sunday
      • Next, click on the Home tab on the Ribbon and click on the Format Painter icon
      •  
      • Now highlight cells A4 through A6 to change the formatting of Wednesday through Friday
  3. Copy the format settings to multiple [disconnected] cells
    • In order to do this, click on the cell that has the format settings you are seeking
    • Click on the Home tab on the Ribbon (Menu)
    • In the Clipboard section on the very left, double-click on the Format Painter icon
    • Next, click on the cells that you want to be formatted
    • You should now see the cells adjusted to the new format
    • Either click the Esc key on the keyboard or click the Format Painter icon again when you are done formatting the cells
    • Example 3:
      • In this scenario I want to change Tuesday, Thursday and Saturday to be the same formatting as Sunday
      • First, select cell A1 for Sunday
      • Next, click on the Home tab on the Ribbon and double-click on the Format Painter icon
      •  
      • Now click on cells A3, A5, and A7 to change the formatting of Tuesday, Thursday and Saturday
      • Either click the Esc on the keyboard or click the Format Painter icon again when you are done formatting the cells
Excel ya later!